3.3.2 Securing the rack
3.3.2 Securing the rack
When installing the rack, always adjust the leveling feet as follows, regardless of whether the rack will be anchored to the building floor. Keep the rack level with the leveling feet. Make sure that the casters are approximately 2 mm (0.1 in.) above the floor surface. The casters must not support the weight of the rack.
For fixed installations of the rack
- Fixing in place using the quakeresistant options kit
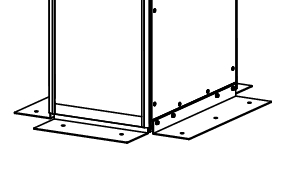
Attach the quakeresistant options kit (which is optional so must be ordered separately) around the rack (front, rear, and sides), and fix it to the slab (building floor) by using the holes in the kit.
|
Figure 3-14 Fixed in place by the quakeresistant options kit
|
|
- Fixing in place using the leveling feet
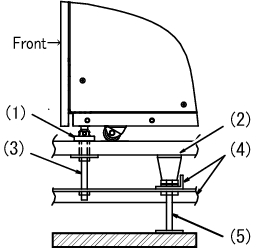
Fix the rack to the slab (building floor) by using holes with a depth of 17 mm (0.7 in.) for screws of size M20 on the bottom of the leveling feet of the rack.
|
Figure 3-15 Example of being fixed in place by the leveling feet
|
|
| Number in figure | Description |
|---|---|
| 1 | Leveling foot |
| 2 | Free-access floor |
| 3 | Bolt (M20) |
| 4 | Frame |
| 5 | Supporting column |
For non-fixed installations of the rack
- Fixing in place using the toppling prevention stabilizer
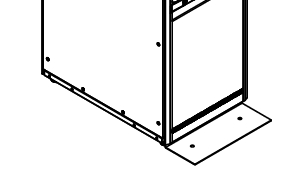
| Note - Attach the stabilizer as a measure to prevent the rack from toppling during system maintenance. For non-fixed installations, always attach the stabilizer when installing the rack. The stabilizer is attached to the rack as shown below. |
|
Figure 3-16 Illustration of L-shaped stabilizer attachment
|
|
|

< Previous Page | Next Page >