8.4 Incorporating the SPARC M12-2S to be Added
8.4 Incorporating the SPARC M12-2S to be Added
This chapter describes the procedure for adding the SPARC M12-2S to a building block configuration.
For details on the commands used here, see the Fujitsu SPARC M12 and Fujitsu M10/SPARC M10 XSCF Reference Manual of the XCP version used.
For details on the commands used here, see the Fujitsu SPARC M12 and Fujitsu M10/SPARC M10 XSCF Reference Manual of the XCP version used.
- Execute the addfru command and add the SPARC M12-2S by following the message.
| Note - When no IP addresses of SSCP have been set up, an error will occur. |
| Note - Multiple chassis cannot be specified by the addfru command. Do the expansion work one unit at a time. |
| Note - When the addfru command is executed, the version of the firmware on the SPARC M12-2S to be added will automatically be aligned with that of the firmware of SPARC M12-2 where the master XSCF is running. We recommend updating the XCP firmware on the master XSCF to the latest version in advance. |
In the following example, BB#1 is added.
- a. Select the BB to be added. Here BB#1 is selected.b. Select the FRU(BB) to be added. Here BB itself is selected.c. Select the BB to be added.
d. Enter [a] for add.
| XSCF> addfru ----------------------------------------------------------------------- Maintenance/Addition Menu Please select the chassis including added FRU. No. FRU Status --- ------------------- -------------- 1 /BB#0 Normal 2 /BB#1 Unmount 3 /BB#2 Unmount 4 /BB#3 Unmount ----------------------------------------------------------------------- Select [1-4|c:cancel] :2 Maintenance/Addition Menu Please select the BB or a type of FRU to be added. 1. BB itself 2. PSU (Power Supply Unit) ----------------------------------------------------------------------- Select [1,2|c:cancel] :1 Maintenance/Addition Menu Please select a FRU to be added. No. FRU Status --- ------------------- -------------- 1 /BB#1 Unmount ----------------------------------------------------------------------- Select [1|b:back] :1 You are about to add BB#1. Do you want to continue?[a:add|c:cancel] :a Please execute the following steps: 1) After the added device is connected with the system, please turn on the breaker of the BB#1. 2) Please select[f:finish] : |
- Mount the target SPARC M12-2S in the rack.a. During the execution of the command, the following message may appear: "1) After the added device is connected with the system, please turn on the breaker of the BB#1." If it appears, stay away from the command operation temporarily.c. Set the ID for identifying the added SPARC M12-2S.
For details, see "4.1 Setting the ID (BB-ID) Identifying the SPARC M12-2S."d. Connect the XSCF BB control cable and crossbar cable to the added SPARC M12-2S.
For details, see "4.2 Connecting XSCF Cables" and "4.3 Connecting Crossbar Cables."
After the cables are connected, connect the power cord and start the XSCF.
Confirm that the READY LED of the XSCFU is blinking at this time.
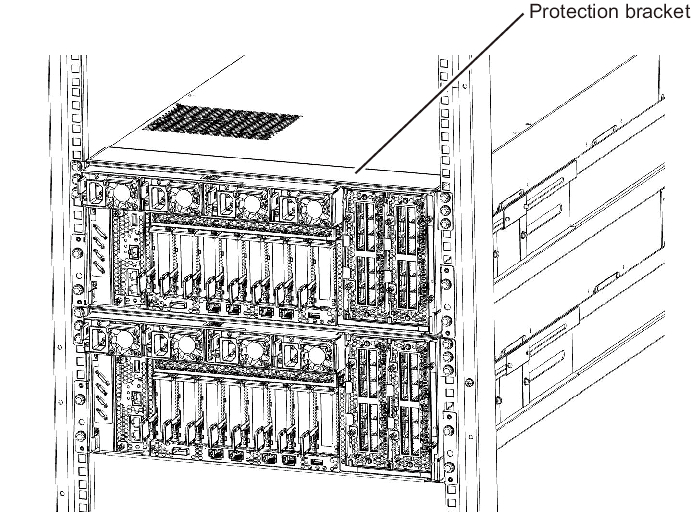
| Note - When adding the SPARC M12-2S to the existing expansion rack, you need to remove the protection bracket at the space of the mounting destination and the blank plates (four plates). The blank plate is fastened with two M6 screws. The protection bracket is fastened with six M6 screws. Store the removed blank plates and M6 screws for future use when the SPARC M12-2S is removed. After adding the SPARC M12-2S, install the protection bracket and M6 screws at their original locations, for future use when the expansion rack is moved. |
|
Figure 8-1 Protection Bracket
|
|
- Return to the command execution screen of the master XSCF and enter [f].
2) Please select[f:finish] :f Waiting for BB#1 to enter install state. [This operation may take up to 20 minute(s)] (progress scale reported in seconds) 0..... 30.... done Waiting for BB#1 to enter ready state. [This operation may take up to 45 minute(s)] (progress scale reported in seconds) 0..... 30..... 60... done |
- Skip the diagnosis of the SPARC M12-2S to be added and complete the addfru command.a. Enter [c] for cancel.b. Enter [y] for yes and skip the diagnosis processing for the BB to be added.c. When the message "The addition of BB#1 has completed." is displayed, enter [f].d. Finally, entering [c] to complete the addfru command.
| Do you want to start to diagnose BB#1?[s:start|c:cancel] :c Diagnostic tests are about to be skipped. Running diagnostic tests are strongly recommended before using BB#1. Are you sure you want to skip testing?[y:yes|n:no] :y [Warning:007] Running diagnostic tests on BB#1 is strongly recommended after addfru has completed. The addition of BB#1 has finished.[f:finish] :f ------------------------------------------------------------------------------ Maintenance/Addition Menu Please select the chassis including added FRU. No. FRU Status --- ------------------- -------------- 1 /BB#0 Normal 2 /BB#1 Normal 3 /BB#2 Unmount 4 /BB#3 Unmount ------------------------------------------------------------------------------ Select [1-4|c:cancel] :c |
< Previous Page | Next Page >