4.1 Setting the ID (BB-ID) Identifying the SPARC M12-2S
4.1 Setting the ID (BB-ID) Identifying the SPARC M12-2S
This section describes the setting of the ID (referred to below as BB-ID) required for identifying each of multiple SPARC M12-2S units in the system.
Set BB-IDs sequentially from 00.
See the following and check the SPARC M12-2S mounting locations and BB-ID setting values.
Set BB-IDs sequentially from 00.
See the following and check the SPARC M12-2S mounting locations and BB-ID setting values.
- Direct connections between chassis: See Figure 2-2 in "2.4.1 Mounting Conditions for General Racks."
| Note - The default BB-ID value is 00. There are cases where each BB-ID is set by the factory at the time of shipping. A BB-ID has been set for any chassis that is shipped mounted in a rack. |
| Note - When setting the SPARC M12-2S used as a standalone unit in a building block configuration, execute the restoredefaults -c factory -r activation command of the XSCF to return to the factory defaults before setting a BB-ID. The defaults include the CPU Activation key information. |
- Set a BB-ID for the SPARC M12-2S.
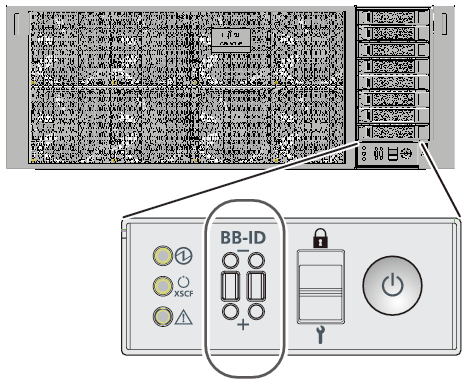
Set the BB-ID by operating the BB-ID switch on the operation panel on the front of the chassis. Set BB-IDs sequentially from 00 to 15 for the SPARC M12-2S.a. Confirm that the set BB-ID for the SPARC M12-2S mounted at the very bottom of the rack (BB#00) is 00.
If it is not 00, set it to 00 with a thin, pointed instrument.b. Next, set 01 for the BB-ID of the SPARC M12-2S mounted second from the bottom of the rack (BB#01).c. Sequentially set BB-IDs for all the SPARC M12-2S units while checking their mounting locations in the rack.
|
Figure 4-1 BB-ID Switch of the SPARC M12-2S
|
|
- Confirm the BB-ID setting for the crossbar box.
The BB-ID for the crossbar box is set at the time of factory shipment. In this step, confirm the mounting position of the crossbar box and also confirm that BB-ID is set sequentially from 80 to 83.
If the setting has been made otherwise, operate the BB-ID switch located on the operation panel at the front panel of the crossbar box to correct the setting.
< Previous Page | Next Page >