2.1 Safety Precautions
2.1 Safety Precautions
This section describes precautions regarding installation of the SPARC M12-2S and the PCI expansion unit. Be sure to follow the precautions below when performing installation work. Failure to do so may lead to damage to the device or a malfunction.
- Follow all the stated precautions, warnings, and instructions for the SPARC M12-2S and PCI expansion unit.
- The SPARC M12-2S and the PCI expansion unit is not suitable for use in locations where children are likely to be present. Therefore, care should be taken to place the device in an environment away from children.
- Do not insert any foreign object into the openings of the SPARC M12-2S and PCI expansion unit. Any object that touches a high-voltage part or causes a component to short circuit may lead to fire or electric shock.
- Contact a service engineer for inspection of the SPARC M12-2S and the PCI expansion unit.
Safety precautions when working with electricity
- Confirm that the voltage and frequency of your input power supply match the electric rating described on the system name plate label affixed on the server.
- Make sure to wear a wrist strap when handling the internal storage (HDD/SSD), CPU memory unit (upper/lower unit), memory, or other printed circuit boards.
- Make sure to use grounded power outlets.
- Do not make mechanical or electrical modifications to the chassis. We do not take responsibility for regulatory compliance of a modified chassis.
- Do not disconnect a power cord from the SPARC M12-2S or PCI expansion unit while it is still powered on.
- This product is also designed for an IT power system with the phase-to-phase voltage 230 V. (For use in Norway)
Safety precautions regarding racks
- The rack must be secured to the floor, ceiling, or nearest frame.
- The quakeresistant options kit may be supplied with the rack. The use of the quakeresistant options kit prevents the rack from toppling over when the chassis is pulled out from the rack for installation or maintenance.
- In the following cases, a safety evaluation must be performed by a service engineer before installation or maintenance.- If the quakeresistant options kit is not supplied and the rack is not secured to the floor with bolts, a service engineer confirms the safety of the rack, such as by verifying that it does not topple over when the SPARC M12-2S and the PCI expansion unit are pulled out from the rack.- If the rack is mounted on a raised floor, the service engineer confirms that the floor can withstand the load when the chassis is pulled out from the rack. Secure the rack to the concrete floor beneath the raised floor by using the original mounting kit that serves this purpose.
- If multiple units of the SPARC M12-2S and the PCI expansion unit are mounted in the rack, perform maintenance on one unit at a time.
- If the SPARC M12-2S is mounted and used in a general rack, remove all of the SPARC M12-2S(s) from the rack when relocating the rack within the room or building or to another building depending on the customer's situation, or when changing the system configuration and changing the installation location due to expansion or reduction.
After moving and securing the general rack to the new location, mount each SPARC M12-2S.
For a system using an expansion rack, when moving the rack, you do not need to remove any SPARC M12-2S.
Safety precautions regarding installation work
- With this chassis installed in a closed or multi-unit rack assembly, the ambient temperature inside the rack operating environment may be greater than the ambient room temperature. Therefore, consideration must be given to installing the chassis in an environment compatible with the manufacturer's maximum rated ambient temperature.- Consideration of air-conditioning adjustments, such as air circulation, is needed to prevent the ambient temperature inside the rack from exceeding the maximum ambient operating temperature of this chassis.- Maximum ambient operating temperature of this chassis: 35°C
- The installation of the chassis in a rack should allow sufficient airflow for the chassis to operate safely.- This chassis has ventilation slits at the front and rear of the chassis.- To prevent overheating, do not cover or close these ventilation slits.
- The mounting of the chassis in the rack should not create any hazardous condition due to uneven mechanical loading. To keep the entire rack stable, secure the rack to the wall or floor by suitable means.- Be careful not to injure yourself or others when installing the chassis in the rack.- Do not install this chassis in the rack if it may make the entire rack unstable.- Weight of this chassis in the maximum configuration:
Model SP-2HBB (SPARC M12-2S): 60 kg
Model SP-PCI-BOX (SPARC PCI-BOX): 22 kg - If the chassis is supplied power from a power strip or the service outlet of another chassis, it may overload the power strip or the power cord of the other chassis.- Confirm that the power strip or the power cord of the service outlet exceeds the combined ratings of all the equipment to which it supplies power.- Electrical ratings of this chassis:
Model SP-2HBB (SPARC M12-2S): 200-240 VAC, 17.6-14.7 A, 50/60 Hz, single phase (8.8-7.4 A per input, maximum 4 inputs)
Model SP-PCI-BOX (SPARC PCI-BOX): 100-120/200-240 VAC, 5.0-4.2/2.5-2.1 A, 50/60 Hz, single phase (maximum 2 inputs) - Be sure to securely ground all the equipment mounted in the rack. Pay particular attention when the power supply is not directly connected from the distribution panel (e.g., when power strips are used).
|
- Install this equipment such that it is near a wall and a power outlet is easily accessible.
|
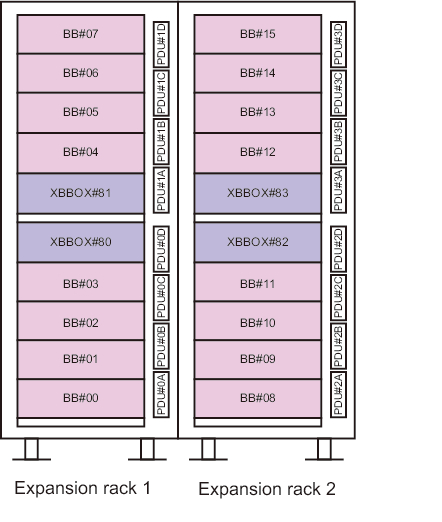
Figure 2-1 Rack Configuration (in the Case of 16BB)
|

|
< Previous Page | Next Page >
