7.4.2 System-Stopped/Cold Maintenance
7.4.2 System-Stopped/Cold Maintenance
All the FRUs can be replaced in the maintenance in the system-stopped/cold state and with all the crossbar boxes and the SPARC M12-2S/M10-4S powered off.
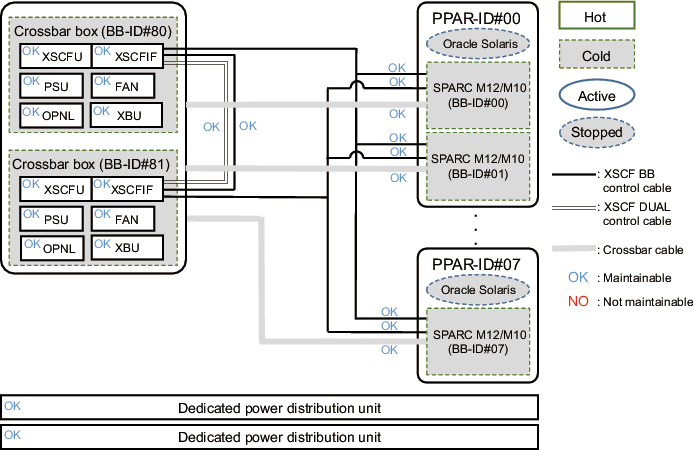
Figure 7-15 shows FRUs with system-stopped/cold maintenance enabled.
|
Figure 7-15 FRUs With System-Stopped/Cold Maintenance Enabled
|
|
| Note - When replacing the microSD card at the same time as the XSCF unit of a SPARC M10 system, replace them during system-stopped/hot maintenance. |
| Note - The XSCF unit and the interface unit cannot be replaced at the same time. If you replace them at the same time, the system may not start correctly. When replacing both the XSCF unit and the XSCF interface unit, replace only one of them first. After its firmware startup completes, disconnect the power cord of the other unit for replacement. |
| Note - To remove the XSCF BB control cable, the XSCF DUAL control cable, and the crossbar cable from the chassis and reconnect them, see "Appendix B Cable Connection Information on Building Block Configurations" in the Fujitsu SPARC M12-2S Installation Guide or "Appendix B Cable Connection Information on Building Block Configurations" in the Fujitsu M10-4S/SPARC M10-4S Installation Guide. |
For the workflow and procedure for replacing FRUs in the system-stopped/cold state, see Figure 7-16 and Table 7-12.
|
Figure 7-16 Workflow for System-Stopped/Cold Replacement
|

|
| Item |
Work Procedure | Reference | |
|---|---|---|---|
| 1 | Opening the rack door | ||
| 2 | Switching the mode switch on the operation panel to Service mode | "5.2.2 Switching the Mode Switch to Service Mode" | |
| 3 | Checking the operating condition of the system | "5.2.1 Checking the Operating Condition of the Physical Partition or Logical Domain" | |
| 4 | Stopping all the physical partitions | "5.2.5 Stopping the Entire System" | |
| 5 | Disconnecting the power cords of all the chassis that make up the building block | "5.5.1 Removing the Power Cord" | |
| 6 | Replacing a faulty FRU | ||
| Replacing the XSCF unit | "8.4 Removing the XSCF Unit" "8.5 Switching the microSD Card" "8.6 Installing the XSCF Unit" |
||
| Replacing the XSCF BB control cable | "9.3 Removing an XSCF BB Control Cable" "9.4 Installing an XSCF BB Control Cable" |
||
| Replacing the XSCF DUAL control cable | "10.3 Removing an XSCF DUAL Control Cable" "10.4 Installing an XSCF DUAL Control Cable" |
||
| Replacing the crossbar cable | "11.3 Removing a Crossbar Cable (Optical)" "11.4 Installing a Crossbar Cable (Optical)" |
||
| Replacing the crossbar unit | "12.3 Removing a Crossbar Unit" "12.4 Installing a Crossbar Unit" |
||
| Replacing the power supply unit | "13.3 Removing a Power Supply Unit" "13.4 Installing a Power Supply Unit" |
||
| Replacing the XSCF interface unit. | "14.4 Removing the XSCF Interface Unit" "14.5 Installing the XSCF Interface Unit" |
||
| Replacing the fan unit | "15.3 Removing a Fan Unit" "15.4 Installing a Fan Unit" |
||
| Replacing the fan backplane | "16.3 Removing the Fan Backplane" "16.4 Installing the Fan Backplane" |
||
| Replacing the operation panel | "17.4 Removing the Operation Panel" "17.5 Installing the Operation Panel" |
||
| Replacing the cable kit | "18.3 Removing the Cable Kit" "18.4 Installing the Cable Kit" |
||
| Replacing the crossbar backplane unit | "19.3 Removing the Crossbar Backplane Unit" "19.4 Installing the Crossbar Backplane Unit" |
||
| Replacing the dedicated power distribution unit | "20.3 Removing the Dedicated Power Distribution Unit" "20.4 Installing the Dedicated Power Distribution Unit" |
||
| 7 | Connecting the power cords of all the chassis that make up a building block (*1)(*2)(*3) | "6.1.1 Installing the Power Cord" | |
| 8 | Checking the XCP firmware version (*4) | "8.7 Checking the XCP Firmware Version" | |
| 9 | Diagnosing the crossbar unit and the crossbar cable if crossbar unit replacement or crossbar cable replacement has been performed | "6.3.1 Diagnosing the Crossbar Unit and Crossbar Cables" | |
| 10 | Confirming that there is no problem with the replacement FRU | "6.3.2 Checking the FRU Status After Maintenance" | |
| 11 | Switching the mode switch on the operation panel to Locked mode | "6.6 Returning the Mode Switch to Locked Mode" | |
| 12 | Starting the system | "6.8 Starting the Entire System" | |
| 13 | Closing the rack door | ||
| *1 If you have replaced an XSCF unit and the XCP firmware version is different between the maintenance part and the existing system, the message "XSCF firmware update now in progress. BB#xx, please wait for XSCF firmware update complete." appears at login to the XSCF. Then, the XCP firmware version will be automatically matched. The version matching takes about 50 minutes. Execute the showlogs monitor command, and check for the "XCP firmware version synchronization completed" message. The displayed message indicates the completion of version matching in an XCP firmware update. *2 If you have replaced the XSCF unit using the replacement microSD card in "6. Replacing a faulty FRU," the "SCF:Gaps between XBBOX-ID" message may appear in the error log. If so, ignore the message. *3 If you have replaced an XSCF unit in "6. Replacing a faulty FRU," the "SCF:SCF Diagnosis initialize RTC" message may appear in the error log. If so, ignore the message. *4 In replacement of a FRU other than an XSCF unit in "6. Replacing a faulty FRU," this work is not required. Even if you switched the microSD card when replacing an XSCF unit, this work is not required. |
|||
< Previous Page | Next Page >