2.2.1 How to Log In to the XSCF Shell With a Serial Connection
2.2.1 How to Log In to the XSCF Shell With a Serial Connection
This section describes how to connect a terminal to the serial port and log in to the XSCF shell.
- Confirm that the connected serial cable is inserted in the serial port of the master XSCF and correctly connected to the PC or workstation used.
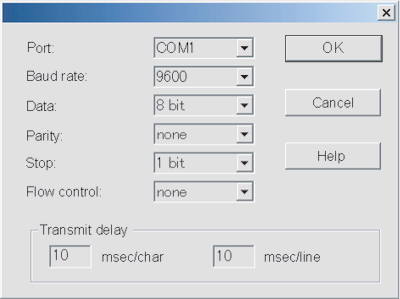
- Confirm that the following values are the terminal software settings:
Baud rate: 9600 bps
Data length: 8 bits
Parity: None
Stop bit: 1 bit
Flow control: None
Transmission delay: Other than 0
- Figure 2-15 shows an example of configuring terminal software. If a connection cannot be established, increase the delay.
|
Figure 2-15 Example of Terminal Software Settings
|
|
- Establish the serial connection, and press the [Enter] key.
The terminal becomes the XSCF shell terminal, and the login prompt is output. - Enter an XSCF user account and password to log in to the XSCF.
| login: jsmith Password: xxxxxxxx |
- Confirm that the XSCF shell prompt (XSCF>) appears.
You can now use the XSCF shell.
| Note - If the user who logged in to the XSCF shell in the serial connection last time terminated that connection while the console command was being executed, the XSCF shell prompt may not appear. If the XSCF shell prompt does not appear, enter "#.". The "XSCF>" prompt is displayed while the console command was being executed. |
| XSCF> |
< Previous Page | Next Page >